14.Container
14.1FloatingLayer
Summary | Creates a popup-like window within a window. |
|---|---|
Features |
|
Major Usage |
|
Figure 14-1.FloatingLayer

API | Description |
|---|---|
useModal |
|
documentTitle |
|
Figure 14-2.documentTitle="true" Vs. documentTitle="false"

14.2Generator
Summary | Designed to be more efficiently create a group of multiple components. |
|---|---|
Features |
|
Major Usage | Interfaces to generate web UI comprising of multiple components (Example: Adding input boxes) |
Figure 14-3.Generator

API | Description |
|---|---|
|
|
|
|
|
|
|
|
Chart
GridView
Menu
Switch
TabControl
TreeView
WindowContainer
Generator: Supports dynamic addition and deletion of the components in the group to be automatically generated.
Repeat: Statically generates the component group.
In most cases where web UIs are repeatedly created, the use of the Generator component is recommended.
14.3Group
Summary | Groups multiple components. |
|---|---|
Features |
|
Major Usage |
|
API | Description |
|---|---|
init(); |
|
invoke(); |
|
Download from the Internet or
View in WEBSQUARE_DEV_PACK (/Group/onmouseleave_onmouseenter_Group.xml)
Figure 14-4.YouTube Video (https://youtu.be/F6d6zU6mmtU)

Download from the Internet or
View in WEBSQUARE_DEV_PACK
(/AutoComplete/nextTabByEnter_nextTabID_AutoComplete.xml)
14.4ScrollView
Summary | Provides touch scrolling on mobile devices. |
|---|---|
Features | Can contain other components like the Group component. |
Figure 14-5.ScrollView

14.5SlideHide
Summary | Provides a slider to show or hide the contents. |
|---|---|
Features | Displays a define layer through animation depending on the fired event. In the initial status, only displayed as defined ( In case a certain event ( |
Major Usage | Displays UI upon the end user’s placing the mouse. Functions similar to the quick menus. |
Figure 14-6.SlideHide

14.6Switch
Summary | In case multiple cases need to be supported, the Switch components allows for creation of separate web UIs for each of the cases. |
|---|---|
Features |
|
Major Usage |
|
Application |
|
Figure 14-7.Switch

14.7TabControl
Summary | Creates tab-like windows. Drawing a TabControl component will generate one tab and the content area. Each content area can contain other components like the Group component. |
|---|---|
Features |
|
Major Usage | Web UI comprising of multiple tabs |
Video Guide |
14.7.1Tab Frame Type (frameMode)
Option | Description |
|---|---|
frameMode="iframe" |
|
frameMode="wframe" |
|
frameMode="wframePreload" |
|
In case of alwaysDraw="false", contents are loaded only when the corresponding wframe or wframePreload tab is activated.
However, note the difference between wframe and wframePreload tabs.
frameMode="wframe"
(1) Creates an object only when the tab is activated.
(2) Objects contained in the inactive tabs cannot be referred to.
frameMode="wframePreload"
(1) Sets an object by loading the src page.
(2) No rendering is not made. (Rendering-related APIs such as a background-changing function are not executed.)
(3) As a result, objects in the inactive tab are referable.
Item | wframe | wframePreload | |
|---|---|---|---|
Tab Loading and Page Rendering | First Tab |
|
|
Other Tabs |
|
| |
Creating objects contained in the tab | Upon the tab being activated | Upon the tab being loaded. | |
Referring to the objects in the tab | Only objects in the activated tabs are referable. | Objects in inactive tabs are referable. | |
Code 14-1.Example
// The following is an example.
// Using the same frameMode is recommended in the TabControl.

<w2:tabControl id="tabControl1">
    <w2:tabs label="tab_iframe" id="tabs1"></w2:tabs>
    <w2:tabs label="tab_wframe" id="tabs2"></w2:tabs>
    <w2:tabs label="tab_wframePreload" id="tabs3"></w2:tabs>
        <w2:content id="content1" alwaysDraw="false" src="sub.xml"
            frameMode="iframe"></w2:content>
        <w2:content id="content2" alwaysDraw="false" src="sub2.xml"
            frameMode="wframe" scope="true"></w2:content>
        <w2:content id="content3" alwaysDraw="false" src="sub3.xml"
            frameMode="wframePreload" scope="true"></w2:content>
</w2:tabControl>
14.7.2Event Loading Sequence

Page | initScript | postScript | onpageload | ontabload | ||
|---|---|---|---|---|---|---|
TabControl | 4 | |||||
Tab (WFrame) | 1 | 3 | ||||
Page (XML) | 2 | |||||
14.7.3Adding Tabs (addTab)
WFrame tabs can be created. Note, however, that the scope setting must be added.
Define a JSON-type dataObject containing parameters and pass it when creating a tab.
The passed parameters can be returned by $p.getParameter(name);. In the following example, $p.getParameter("pageParam"); is used to get the name of the src page.
Code 14-2.Dynamic Tab Creation (Example)
tabControl1.addTab("cmcm011", {
    "label": "Common Code",
    "title": "Common Code",
    "openAction": "exist",
    "closable": "true"
}, {
    "src": "CodeManage.xml",
    "frameMode": "wframePreload"
    "scope": true,
    "alwaysDraw": "true",
    "dataObject": {
        "type": "json",
        "name": "pageParam",
        "data": {
            "name": "WebSquare",
            "addr": "Seoul"
        }
    }
});14.7.3.1Passing Parameters through dataObject
Pass parameters to the new tab added by addTab through the dataObject. On the created tab, check the received parameters through $p.getParameter.
Code 14-3.addTab (Example)
scwin.addTab = function(label, tabId, src) {
    var tabOpt = {
        label: label,
        closable: true,
        addTabIndex: 0
    };
    var contOpt = {
        frameMode: "iframe",
        scope: true,
        src: src,
        alwaysDraw: false,
        title: tabId,
        "dataObject": {
            "type": "json",
            "name": "dataObject",
            "data": {
                "tabId": tabId,
                "src": src,
                "callback": "$p.parent().scwin.tac_main_callback"
            }
        }
    };
    tabControl1.addTab(tabId, tabOpt, contOpt);
}14.7.3.2Progress Dialog
In case the src page of the WFrame tab contains a submission, the developer can set to display the process window that is generated upon execution of the submission within the WFrame.
Displaying the process message within the WFrame tab (processMsgFrame="true") - TabControl
Moreover, by changing the settings in the Config.xml file, the developer can change the source of the process message.
14.7.4Scope Referencing
WFrame tabs can be referred to by getWindow and $p.parent APIs.
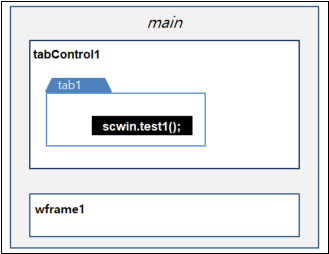
Script Location | Accessing Method |
|---|---|
main() | tabControl1.getWindow("tab1").scwin.test(); |
wframe1 | $p.parent().tabControl1.getWindow("tab1").scwin.test(); |
14.7.5Changing the src Property
When dynamically changing the path of the content page, use the getFrame API.
Code 14-4.Example
tabControl1.getFrame("tab1").setSrc(
        "/ui/tab2.xml", {
            "dataObject": {
                "type": "json",
                "name": "pageParam",
                "data": {
                    "name": "WebSquare",
                    "addr": "Seoul"
                }
            }
);14.7.6When There are Multiple Tabs
14.7.6.1Position of Tabs (tabPosition)
When there are multiple tabs, the developer can decide where to display the tabs by setting the tabPosition property.
Figure 14-8.tabPosition="top"

Figure 14-9.tabPosition="left"

Figure 14-10.tabPosition="right"

Figure 14-11.tabPosition="bottom"

Download from the Internet or
View in WEBSQUARE_DEV_PACK (/TabContrl/tabPosition_TabControl/)
Figure 14-12.YouTube Video (https://youtu.be/HXLexQKZUTU)

14.7.6.2Scroll and Tab List (tabScroll="true")
When creating multiple tab, add tabScroll="true" setting to display a scroll and a tab list on the top.
Figure 14-13.tabScroll="false"

Figure 14-14.tabScroll="true"

Download from the Internet or
View in WEBSQUARE_DEV_PACK (/TabControl/tabScroll_tabPosition_TabControl/)
Figure 14-15.YouTube Video (https://youtu.be/G2NKZg9n_eM)

14.7.6.3Activating Tab by Scroll Button (changeActiveTab="true")
Setting as tabScroll="true" will display scroll buttons and clicking the scroll button will only show the tab list. Adding changeActiveTab="true" setting, however, will allow the end user to activate a tab on the tab list.
Download from the Internet or
View in WEBSQUARE_DEV_PACK(/TabControl/tabScroll_changeActiveTab_TabControl/)
Figure 14-16.YouTube Video (https://youtu.be/srqwDbr70FM)

14.7.6.4Moving Remaining Tabs Forward upon Tab Closing (tabScrollAuto="true")
Moreover, by adding tabScrollAuto="true", the developer can display as many tabs as possible.
Figure 14-17.tabScrollAuto="false"

Figure 14-18.tabScrollAuto="true"

Video Guide – Adding a scroll and a tab list for multiple tabs. (TabControl)
Sample File
14.7.7Keeping Child Tab Disabled
Setting as keepDisabledTab="true" will keep the child tab disabled regardless of the status of the parent tab.
For example, when a tab in the parent TabControl has a child TabControl, the disabled tab of the child TabControl will remain disabled although the tab of the parent TabControl is activated or enabled.
Download from the Internet or
View in WEBSQUARE_DEV_PACK (/TabControl/keepDisabledTab_TabControl/)
Figure 14-19.YouTube Video (https://youtu.be/5BCe5c4avtM)

14.7.8PopUp
14.7.8.1Displaying PopUp in the Specified Frame
When creating a frameMode="wframe" or frameMode="wframePreload" tab and opening a popup on the wframe or wframePreload tab with $open.popUp(), the developer can specify the frame to display the popup. Use $open.popUp() function and options.frameModal option.
Download from the Internet or
View in WEBSQUARE_DEV_PACK
(/TabControl/frameMode_tabControl_content_openPopup_frameModal_$p/)
Figure 14-20.YouTube Video (https://youtu.be/dGoIpOaHJcA)

14.7.8.2Closing Parent – Child PopUps
The developer can create popups on a tab using $p.openPopup() and can close all child popups and the parent popup.
Note, however, this feature is valid only on the WFrame tabs. Create a
frameMode="wframe"orframeMode="wframePreload"tab.Set the
frameModalof the TabControl as"true".
Download from the Internet or
View in WEBSQUARE_DEV_PACK(/TabControl/frameModal_TabControl/)
Figure 14-21.YouTube Video (https://youtu.be/eA6lQkcBGsY)

14.7.9Major APIs
API | Description |
|---|---|
|
|
|
|
|
|
|
|
closable |
|
tabMove | Allows change of the tab orders through drag-and-drop through tabMove="true". |
|
|
|
|
|
|
|
|
|
|
|
|
|
|
|
|
deleteAllTabs |
|
|
|
|
|
|
|
14.8TableLayout
Summary | To tagname property of the Group, add HTML5 tags (<colgroup>, <tr>, <td>, <th>) and wrap them under <table> tag. |
|---|---|
Features |
|
Major Usage |
|
Application | |
Video Guide |
Figure 14-22.TableLayout

14.8.1Rendering
14.8.2Adaptive Web
14.8.3DataCollection Binding and Automatic Component Insertion
Draw a TableLayout component.

Create a DataMap as shown below.

Figure 14-23.DataMap

Drag the DataMap key on the Output tab to a cell in the TableLayout.
Check if the following popup shows up.

Select the component to bind with the DataMap.
Figure 14-24.Component Selection

The following is after the component is bound in each cell. Component key values (Name, Nationality, etc.) are automatically inputted, and the DataMap is also displayed.
Figure 14-25.After Binding

14.9WidgetContainer
Summary |
|
|---|---|
Functions |
|
Features |
|
Related Components |
|
Video Guide |
14.9.1Positioning
Code 14-5.Initial State of WidgetContainer.xml
<w2:widgetContainer id="widgetContainer1" cols="8"
    style="width:100%; height:800px;"
    unitHeightPixel="200" mode="pushpull"></w2:widgetContainer>
The WidgetContainer creates a twp-dimensional coordinate system based on cols and unitHeightPixel settings.
Figure 14-26.Coordinate System of the WidgetContainer

Locations and sizes of all widgets contained in the WidgetContainer are decided based on the coordinate system. Adding Widgets When adding widgets, decide the position and the size of the widget using the following options.
- Related Options
x: X position
y: Y position
unitWidth: Width on the coordinate system
unitHeight: Height on the coordinate system
Figure 14-27.Determining Widget Positions and Sizes

14.9.2Adding Widgets
The widgets of the WidgetContainer can be dynamically created and added only by the addWidgets function. (Directly adding a widget on the XML file is not allowed.)
The following figure shows basic structure of the widget. The contents part is on the WFrame which carries the XML page (set as the src option.)
Figure 14-28.Widget Structure

- Related Functions
addWidgets( optionsArr ): Define a widget to create using options or as an array.
Property | Description | Required |
|---|---|---|
unitHeight | Widget height on the coordinate system | O |
unitWidth | Widget width on the coordinate system | O |
x | x coordinate of the widget | O |
y | y coordinate of the widget | O |
buttonFormatter | Sets the title button of the widget.
| |
fixed | Fixing status of the widget. (Default: false) A fixed widget cannot be moved nor resized. | |
hasTitleBar | Creates a title bar on the widget.
| |
id | Widget ID. All widgets in the WidgetContainer must have a unique ID. However, in case of scope="true", '_' cannot be used. In case no ID is given, the WidgetContainer will randomly issue an ID. | |
maximized | Maximizes the widget. Maximizes according to the maximizeFormatter setting. The maximized widget is fixed and displayed over other widgets. In this case, the maximized widget and the covered widgets cannot interact each other. | |
maximizeFormatter | Function or name of the function return the setting related to widget maximization. The maximization setting has options of 'top', 'bottom', 'left', and 'right' each of which represents the unit to expand in the corresponding direction. However, if the option is not specified or the value is “-1”, the widget will expand to the fullest into the corresponding direction. When the option value crosses the maximum value, the widget will expand into the opposite direction as much as the exceeding value. (Default: {top: -1, bottom: -1, left: -1, right: -1}) | |
maximizeonfixed | In case of true widget, maximization through the corresponding button is allowed even when there is fixed: true setting. | |
minimized | Minimizes the widget. In case of minimization, only the title will be displayed. | |
minimizeonfixed | In case of true widget minimization through the corresponding button is allowed even when there is fixed: true setting. | |
params | User-defined data to save in the widget object. (Default: undefined) Obtained upon export, and restored with other widget settings upon widget import. | |
scope | scope feature of the WFrame used in the widget. (Default: false) | |
src | Contents to be displayed on the WFrame of the widget. (XML file) If not specified, an empty screen will be displayed. | |
title | Widget title | |
titleClass | Style class to apply to the widget |
14.9.3Import/Export
14.9.3.1All Widgets
The developer can export all existing widgets and can also newly add multiple widgets.
- Related Functions
importWidgets( jsonArr , clearFlag ): Adds new widgets to the WidgetContainer.
exportWidgets: Exports all widgets currently contained in the WidgetContainer.
Code 14-6.export
varjsonArr = widgetContainer1.exportWidgets();
Code 14-7.export
varjsonArr = widgetContainer1.exportWidgets();
14.9.3.2Individual
The developer can export or import one existing widget.
- Related Functions
exportWidget(<widget ID>') : Exports the widget of the corresponding ID.
importWidget( <Widget id>, JSON ): Receives the ID and information of the existing widget in JSON and adds to the WidgetContainer.
Code 14-8.Example
widgetContainer.importWidget('widget1',  {
    id: 'widget1',
    src:"widget.xml",
    scope:true,
    x:0,
    y:0,
    title:"Individual import",
    }
);
14.9.4Access
14.9.4.1Individual Access
- Related Functions
getWidgetById: Returns the widget of the specified ID. (If not exists, null will be returned.)
getWidgetByTitle: Returns the widget of the specified title. (If not exists, null will be returned.)
Code 14-9.Example
var widget0 = widgetContainer1.getWidgetById('widget0');Code 14-10.Example
var widget0 = widgetContainer1.getWidgetByTitle('Widget 0');14.9.4.2Accessing Objects in the Widget
Using the following functions, the developer can access the objects within the widget.
- Related Functions
setSrc
getObj
getObjList
The following is an example.
Code 14-11.Example
varwidget0 = widgetContainer1.getWidgetById('widget0');widget0.setSrc('other_page.xml');varmyObj = widget0.getObj('myObj');varobjList = widget0.getObjList();console.log(myObj);console.log(objList);
14.9.4.3Cross-referencing
When using the scope="true" setting of the WFrame, the WidgetContainer and the widgets contained can refer to each other.
The $p.widget function is designed for widgets only. This function is valid only for the widgets. Use the following functions to get information of the widgets.
- Related Functions
$p.widget.getWidgetId(): Returns the widget ID.
$p.widget.getWidgetContainerId(): Returns the ID of the WidgetContainer that contains the widget.
$p.widget.getWidgetContainer(): Returns the WidgetContainer object that manages the widget.
if($p.widget) {
        dataMap1.set( "key1" , $p.widget.getWidgetId() );
    } else {
        dataMap1.set( "key1" , "Not a widget" );
}- Frequently Used Functions
$p;: Provides utility-like functions.
$p.data;: Controls the DataCollection.
The following is an example to execute a submission in the widget that uses scope="true" setting of the WFrame. In other words, use $p.xxx functions. $p.xxx functions will search submissions in the main area.
Code 14-12.Execution of Submission in the Widget (Example)
scwin.startInit = function() {
    $p.executeSubmission("submission1");
};

scwin.submission1_submitdone = function(e) {
    alert('done');
};

scwin.startInit();14.9.5Title
14.9.5.1Dynamic Change of Text
Use the following functions to dynamically change the text.
- Related Functions
getTitle
setTitle
Code 14-13.Example
varwidget0 = widgetContainer1.getWidgetByTitle('widget0');vartitle = widget0.getTitle();// 'widget0'title +='_MODIFIED';widget0.setTitle(title);// 'widget0_MODIFIED'
14.9.5.2Applying Style
Define the style in the <style> tag. When adding a widget through the addWidgets, specify the defined style in the titleClass property. In this way, the developer can create widgets each of which uses different styles.
Code 14-14.Applying Style (Example)
<head>
...
<script type="text/javascript"><![CDATA[
    widgetContainer1.addWidgets({
            title : "Widget  0",
            ...
            titleClass : "w2widget_red",
    });

    widgetContainer1.addWidgets({
        title : "Widget  1",
        ...
        titleClass : "w2widget_red",
    });

    widgetContainer1.addWidgets({
        title : "Widget  2",
        ...
        titleClass : "w2widget_red",
    });

 ]]></script>
</head>
<style>
    .w2widget_red{
        background-color: red;
        height: 50px;
        font-size: 30px;
        color: white;
    }

    .w2widget_orange{
        background-color: orange;
    }

    .w2widget_green{
        background-color: green;
    }
</style>
Figure 14-29.After Style Applied

14.9.5.3Showing/Hiding Widgets
Using the following APIs, the developer can decide display of all widgets or selected widgets of the WidgetContainer.
Code 14-15.Static Control of Individual Widgets
addWidgets([{
    ...
    hasTitleBar: false,
    ...
}]);Code16.Static Control of Individual Widgets
showTitle();
Code17.Dynamic Control of All Widgets
enableWidgetTitle();
14.9.6Maximize/Minimize
Double-click each widget to minimize or maximize. However, when the widget is fixed, the widget size will not change.
14.9.7Moving & Resizing
The developer can control moving of all widgets in the WidgetContainer.
Individual Widget | All Widgets of the WidgetContainer | |
Static Control | N/A | widgetMove |
Dynamic Control | N/A | enableWidgetMove(); |
The developer can decide whether to allow moving of all or individual widgets in the WidgetContainer using the following APIs.
Individual Widget | All Widgets of the WidgetContainer | |
Static Control | N/A | widgetResize |
Dynamic Control | setResizable(); | enableWodgetResize(); |
14.9.8Checking and Removing All Widgets
With exportWidgets(); or removeWidgetsAll(); functions, the developer can return or remove all current widgets.
14.9.9Prevention of Widget Maximization
14.9.10Example
Before adding a widget, set the ID of the WidgetContainer, and specify cols and unitHeightPixel to create a coordinate system.
Code 14-18.Creating WidgetContainer (Example)
<w2:widgetContainer id="widgetContainer1" minUnitWidth="1" widgetMove="" cols="8" horizontalMargin="0" verticalMargin="0" params="false" widgetResize=""mode="pushpull"threshold="null"style="width:100%;height:100%;margin: 20px;" unitHeightPixel="200"></w2:widgetContainer>
The following is when cols="8" & unitHeightPixel="200" are set.
Figure 14-30.Created Coordinate (cols="8" & unitHeightPixel="200")

Add a widget by writing script on the <script> tab as shown below.
Code 14-19.Example (Adding Widgets)
<script type="text/javascript">
    <![CDATA[
        widgetContainer1.addWidgets({
                id : "widget0",
                title : "Widget 0",
                src : "widget0.xml",
                scope : true,
                x : 0,
                y : 0,
                unitWidth : 2,
                unitHeight : 1
            });

            widgetContainer1.addWidgets({
                id : "widget1",
                title : "Widget  1",
                src : null,
                scope : true,
                x : 1,
                y : 1,
                unitWidth : 1,
                unitHeight : 1
            });

            widgetContainer1.addWidgets({
                id : "widget2",
                title : "Widget  2",
                 src : "widget.xml",
                scope : true,
                x : 3,
                y : 0,
                unitWidth : 2,
                unitHeight : 2
            });
    ]]w2widget_red
</script>
Save the changes and refresh the browser to see whether the widget has been successfully added.
Figure 14-31.Created WidgetContainer (Containing Three Widgets)

Using the buttons on the upper-right corner of each widget, check if the following operations are possible:
Fix
Maximize/Minimize
Close
Move (by dragging the tab)
Resizing (by dragging the lower-right corner)
14.10WindowContainer
Summary | Controls multiple windows through the toolbar. |
|---|---|
Features |
|
Video Guide |
14.10.1Creating Windows (createWindow())
Item | Description |
|---|---|
Related Functions |
|
Define a JSON-type dataObject containing parameters and pass it when creating a tab. The passed parameters can be returned by $p.getParameter(name);. In the following example, $p.getParameter("pageParam"); is to get the name of the src page.
Code 14-20.Dynamically Creating Windows
var obj = {
    "title": "wframeWindow1",
    "windowId": "window1",
    "src": "/ui/window1.xml",
    "frameMode": "wframe",
    "dataObject": {
        "type": "json",
        "name": "pageParam",
        "data": {
            "name": "WebSquare",
            "addr": "Seoul"
        }
    }
};
windowContainer1.createWindow(obj);14.10.1.1Changing the src
When dynamically changing the path of the src page, use the getFrame API.
Code 14-21.Example
windowContainer1.getFrame("window1").setSrc(
        "/ui/tab2.xml", {
            "dataObject": {
                "type": "json",
                "name": "pageParam",
                "data": {
                    "name": "WebSquare",
                    "addr": "Seoul"
                }
            }
);14.10.1.2Passing Parameters through dataObject upon Window Creation
Pass parameters to the new window added by createWindow through the dataObject. On the created window, check the received parameters through $p.getParameter.
Code 14-22.Defining Window Options through dataObject
scwin.createWindow = function(windowIdx) {
    var frameMode = "wframe";
    var windowId = "window" + windowIdx;
    var src = "sub" + windowIdx + ".xml";
    var obj = {
        "title": frameMode + "Window" + windowIdx,
        "windowId": windowId,
        "src": src,
        "frameMode": frameMode,
        "dataObject": {
            "type": "json",
            "name": "dataObject",
            "data": {
                "windowId": windowId,
                "src": src,
                "callback": "$p.parent().scwin.windowContainer1_callback"
            }
        }
    };

    windowContainer1.createWindow(obj);
};undefinedundefinedundefined14.10.1.3Window Frame Type (undefinedframeMode)undefined
undefinedWhen creating a new window with the undefinedcreateWindow function, decide the frame type using the undefinedframeMode option.undefined
undefined|
Usage |
|
|---|---|
|
Description |
Frame type of the new window ( frameMode)
|
|
Option |
Description |
|---|---|
|
frameMode=" iframe" |
|
|
frameMode=" wframe" |
|
undefined14.10.1.4Displaying Process Message on WFrame Windowundefined
undefinedIn case the src page of the WFrame window contains a submission, the developer can set to display the process window that is generated upon execution of the submission within the WFrame window.
undefinedMoreover, by changing the settings in the undefined Config.xmlundefinedfile, the developer can change the source of the process message. undefined
undefinedundefined
undefined Displaying the process message within the WFrame window (processMsgFrame="true") - WindowContainerundefinedundefined
Moreover, by changing the settings in the undefined Config.xmlundefinedfile, the developer can change the source of the process message. undefined
undefinedundefined
undefined Changing the source of the process message to be displayed within the WFrame window (WindowContainer)undefinedundefined
undefined14.10.1.5Disabling History Feature of IFrameundefined
undefinedIf the WindowContainer contains an IFrame, the developer can control moving to the previous page on the IFrame. When undefinedspaReplaceHistory="true" setting is in use, not the page in the IFrame but the entire browser page will move to the previous page. undefined
undefinedundefined
undefinedVideo Guide - undefinedDisabling the history feature in IFrame (WindowContainer) undefined
undefined Sample Fileundefinedundefined
undefined14.10.1.6Event Loading Sequenceundefined
undefinedWindowContainer provides undefinedonwindowload/undefinedonwindowunload events. The undefinedonwindowload event of the WindowContainer is fired after undefinedinitScript and undefinedpostScript of the page are called.undefined
undefinedundefined14.10.1.7Referring to Other Windowsundefined
undefinedWFrame window can be referred to through undefinedgetWindow (same as the existing undefinedgetWindowbyWindowID) and undefined$p.parent API.undefined
undefined
 undefined
|
Script Location |
Accessing Method |
|---|---|
|
main() |
windowContainer1.getWindow("window1").scwin.test(); |
|
wframe1 |
$p.parent().windowContainer1.getWindow("window1").scwin.test(); |
undefined14.10.1.8Setting Default Size of the Windowundefined
undefinedWhen creating a window with undefinedcreateWindow() function, the developer can define the default width and the default height with undefineddefaultWidth and undefineddefaultHeight.undefined
Code 14-23.Exampleundefined
undefined
var winObj = {
    ...
    defaultWidth: "600",
    defaultHeight: "300",
    ...
}
windowContainer1.createWindow(winObj);
When a window is initially created, the window is in maximum size as shown below.
Figure 14-32.Window Initially Created

Clicking the restoration button will restore the window in the size of defaultWidth and defaultHeight.
Figure 14-33.Clicking Window Restoration Button

Download from the Internet or
View in WEBSQUARE_DEV_PACK
(/WindowContainer/createWindow_defaultWidth_defaultHeight_WindowContainer/)
Figure 14-34.YouTube Video (https://youtu.be/gx3a9cI8WRg)

14.10.1.9Checking Window Index
With getSelectedIndex() function, the user can check the index of the selected window. Upon every window being created by createWindow() function, the window index increases by “1”, and upon every window being closed, the window index will be recalculated.
Download from the Internet or
View in WEBSQUARE_DEV_PACK
(/WindowContainer/getSelectedIndex_WindowContainer.xml)
Figure 14-35.YouTube Video (https://youtu.be/AteLPAoIYK8)

14.10.2PopUp
14.10.2.1Displaying PopUp in the Specified Frame
When creating a frameMode="wframe" window and creating a popup using $open.popUp() on the WFrame window, the developer can specify the frame to display the popup. Use $open.popUp() function with options.frameModal option.
Download from the Internet or
View in WEBSQUARE_DEV_PACK
(/WindowContainer/frameMode_windowContainer_window_openPopup_frameModal_$p/)
Figure 14-36.YouTube Video (https://youtu.be/Ch-k_-Vo8Kk)

14.10.2.2Closing Parent – Child PopUps
The developer can create popups on a tab using $p.openPopup() and can close all child popups and the parent popup.
Note that this valid only in the WFrame window.
Create a
frameMode="wframe"window.Set the
frameModalproperty of the window as"true".
Code 14-24.Creating WFrame Windows (Example)
windowContainer1.createWindow({
    "title": "PopUp Closing",
    "windowTitle": "PopUp Closing",
    "src": "01_wframe_frameModal.xml",
    "windowId": "window01",
    "frameMode": "wframe",
    "frameModal": "true"
});Download from the Internet or
View in WEBSQUARE_DEV_PACK
(/WindowContainer/createWindow_frameModal_WindowContainer/)
Figure 14-37.YouTube Video (https://youtu.be/kTIlquVF8yw)

14.10.3Showing Windows
14.10.3.1Arrangement (setArrangeWindows())
setArrangeWindows(); provides four options to arrange windows (vertical, horizontal, cascade, and sequential).
Code 14-25.Example
// (Example 1)
// window1, window3, and window2 are vertically opened.
windowContainer1.setArrangeWindows("vertical", ["window1", "window3", "window2"]);


// (Example 2)
// window2, window1, and window3 are horizontally opened.
windowContainer1.setArrangeWindows("horizontal", ["window2", "window1", "window3"]);
14.10.3.2Automatic Arrangement (autoArrange)
When closing one of the arranged windows, the developer might want the remaining windows to be re-arranged. In this case, use the autoArange property.
Download from the Internet or
View in WEBSQUARE_DEV_PACK (/WindowContainer/autoArrange_WindowContainer/)
Figure 14-38.YouTube Video (https://youtu.be/ZuPDYmLdMM0)

14.10.3.3Window Control Icons (controlIconPosition)
With the controlIconPosition property, the developer can decide where to put the window control icons. Note, however, using the controlIconPosition property requires useNameContainer="true" setting.
controlIconPosition"left"(Default) : Scrolling arrows are on the sides, and the arrangement icons are on the left."right": Scrolling arrows are on the sides, and the arrangement icons are on the right."allright": Scrolling icons are all on the right, and the arrangement icons are also on the right.
Figure 14-39.Window Control Icons (controlIconPosition="allright")

Download from the Internet or
View in WEBSQUARE_DEV_PACK
(/WindowContainer/controlIconPosition_useNameContainer_WindowContainer.xml)
Figure 14-40.YouTube Video (https://youtu.be/UX4YEp2obi8)

14.10.3.4Changing Maximum Number of Windows (setWindowMaxNum())
With setWindowMaxNum() function, the developer can set the maximum number of windows that can be created in the WindowContainer.
14.10.3.5Keeping the Window Always Open (stopMinimizeOnNameLayer)
stopMinimizeOnNameLayer="true" is to keep the windows always open regardless of the end user’s clicking the name layer.
14.10.3.6Window Maximization
The end user can maximize the window by clicking the window maximization button or double-clicking the window tile.
Figure 14-41.Maximization Button and Window Tile

Download from the Internet or
View in WEBSQUARE_DEV_PACK
(/WindowContainer/window_maximization_WindowContainer.xml)
Figure 14-42.YouTube Video (https://youtu.be/HlxA08cFll4)

14.10.3.7Window Minimization
The end user can minimize the window by clicking the window minimization button or clicking the name layer.
Figure 14-43.Minimization Button and Name Layer

Download from the Internet or
View in WEBSQUARE_DEV_PACK
(/WindowContainer/window_minimization_WindowContainer.xml)
Figure 14-44.YouTube Video (https://youtu.be/5VsjK7ob3qI)

14.10.3.8Display of Window Being Dragged (windowMoveType)
Setting as windowMoveType="overflow" allows the end user to drag the window outside of the WindowContainer and displays the dragged window. In the mean time, setting as windowMoveType="restrict" will allow the end user to drag the window only within the WindowContainer.
Item | Decides the position of the dragged window in case the window is dragged outside the WindowContainer. |
|---|---|
Description |
|
Figure 14-45.windowMoveType="overflow"

Figure 14-46.windowMoveType="restrict"

Download from the Internet or
View in WEBSQUARE_DEV_PACK (/WindowContainer/windowMoveType_WindowContainer/)
Figure 14-47.YouTube Video (https://youtu.be/bRaPG5A6s9U)

14.10.3.9Currently Selected Window
The w2window_selected style class is to differentiate the currently selected window from other windows.
Code 14-26.Example
<style>.w2window_selected {border: solid 2px green;}</style>When the above style is applied, the current window will have green bold border as shown below.
Figure 14-48.Example – .w2window_selected {border: solid 2px green;}

Download from the Internet or
View in WEBSQUARE_DEV_PACK
(/WindowContainer/w2window_selected_WindowContainer.xml)
Figure 14-49.YouTube Video (https://youtu.be/IwIiNZJvo1c)

14.10.4Controlling Windows
14.10.4.1Closing All Windows
Item | Description |
|---|---|
Related Properties |
|
14.10.4.2Closing All Windows Except Specified One (closeOthers())
Using closeOthers() function, the developer can close all windows except the currently selected window or a certain window specified by windowID or uniqueID.
Download from the Internet or
View in WEBSQUARE_DEV_PACK (/WindowContainer/closeOthers_WindowContainer.xml)
Figure 14-50.YouTube Video (https://youtu.be/456lXCr-O0Y)

14.10.4.3Prevention of Window Closing
useFixButton="true" is to display the Fix button next to the window name on the name layer.
Also, when useFixbutton="true" and closeType="noneFixedWindow" are used together, the developer can selectively define windows that will not be closed even upon the end user’s clicking Close All button. In other words, some windows may be not closed even upon the end user’s clicking Close All button.
With fixWindow and unfixWindow functions, the developer can dynamically enable/disable the Window Fix button to prevent window closing.
14.10.5Name Layer
14.10.5.1Moving Name Layer (nameLayerMove)
Item | Description |
|---|---|
Related Properties |
|
14.10.5.2Window Order on the Name Layer (nameLayerMove & nameLayerRearrange)
Setting as nameLayerMove="true" and nameLayerRearrange="true" will move the window fixed by the pin (useFixButton="true") to the first position on the name layer.
When no window, is fixed, the windows will be displayed on the name layer in order of "aaa" "bbb" "ccc".
Figure 14-51.No Window Fixed

In case window "bbb" is fixed in the above, "bbb" window will move to the first position on the name layer.
Figure 14-52.When Window "bbb" Is Fixed

Download from the Internet or
View in WEBSQUARE_DEV_PACK
(/WindowContainer/useFixButton_nameLayerRearrange_WindowContainer.xml)
Figure 14-53.YouTube Video (https://youtu.be/BX23wkAgGtQ)

14.10.6Toolbar
14.10.6.1List of the Windows (useWindowScrollButton)
Using the useWindowScrollButton property, the developer can add a button to the toolbar that shows the list of the current windows. Moreover, when displaying the window list button by useWindowScrollButton="true", the developer can limit the row count of the window list through the windowScrollVisibleRowNum property.
Figure 14-54.useWindowScrollButton="true" windowScrollVisibleRowNum="4"

Download from the Internet or
View in WEBSQUARE_DEV_PACK
(/WindowContainer/useWindowScrollButton_windowScrollVisibleRowNum_WindowContainer.xml)
Figure 14-55.YouTube Video (https://youtu.be/woovMy277dg)

Download from the Internet or
View in WEBSQUARE_DEV_PACK
(/WindowContainer/useWindowScrollButton_WindowContainer.xml)
Figure 14-56.YouTube Video (https://youtu.be/QyALhNlbbWk)
